Build Log of Solar System Project 1
2023-04-23
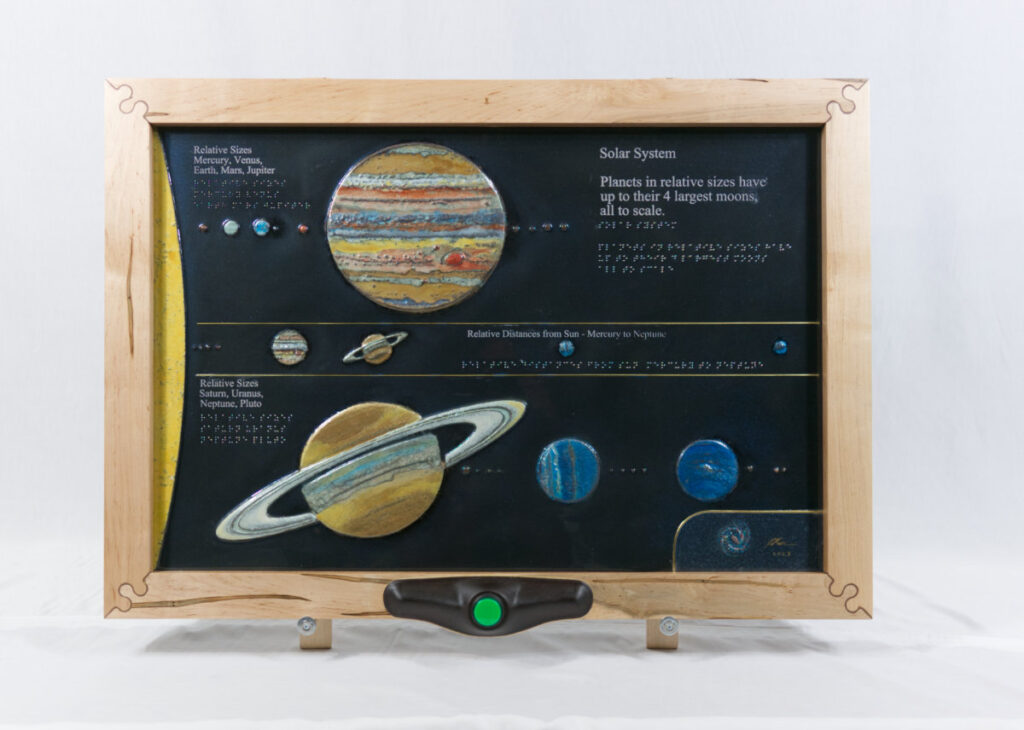
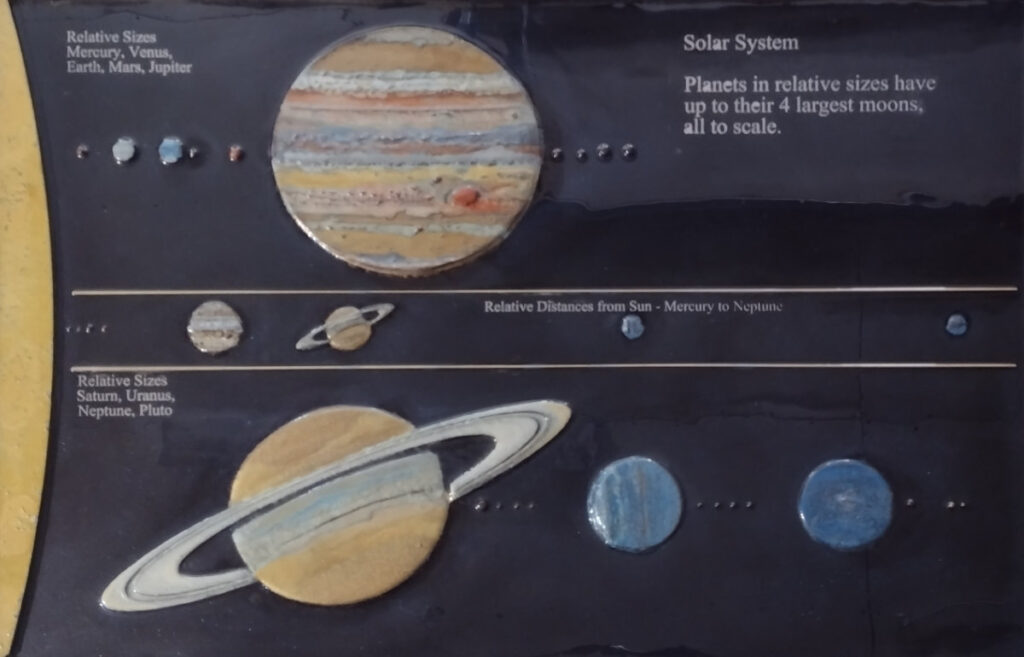
Solar System Project 1 is done. Yesterday I took archival photos and made a video. Today I edited them. Here are the results.
My ksi.ca website has a section on this project. Other ongoing work is here.
2023-04-21
Two months of labour and the Solar System Project sculpture is complete. This morning I attached the sculpture to the frame and installed the back covers. I ended up cutting the back plywood into two – a perimeter and the centre. The centre is tack-nailed to the plywood backing of the sculpture, and the perimeter covers the wiring and electronics area. I repainted all that in black.
Over the next few days I’ll set up my photo studio and take archival and promotional photos. They’ll be posted on ksi.ca, my sculpture site, as well as various social media and discussion fora.
2023-04-19

In the past week there have been several stumbles and some success. A company near Ottawa that I approached regarding doing Braille transcriptions didn’t get back to me despite 3 contact attempts. When I talked to their rep on the phone, he seemed uninterested, and never responded to the follow-up email I sent. However, Joan from the CNIB did respond to my inquiry and seemed eager to work with me. I had already used Uncontracted Braille to do the labelling though, so I will contact them for any collateral material I’ll need.
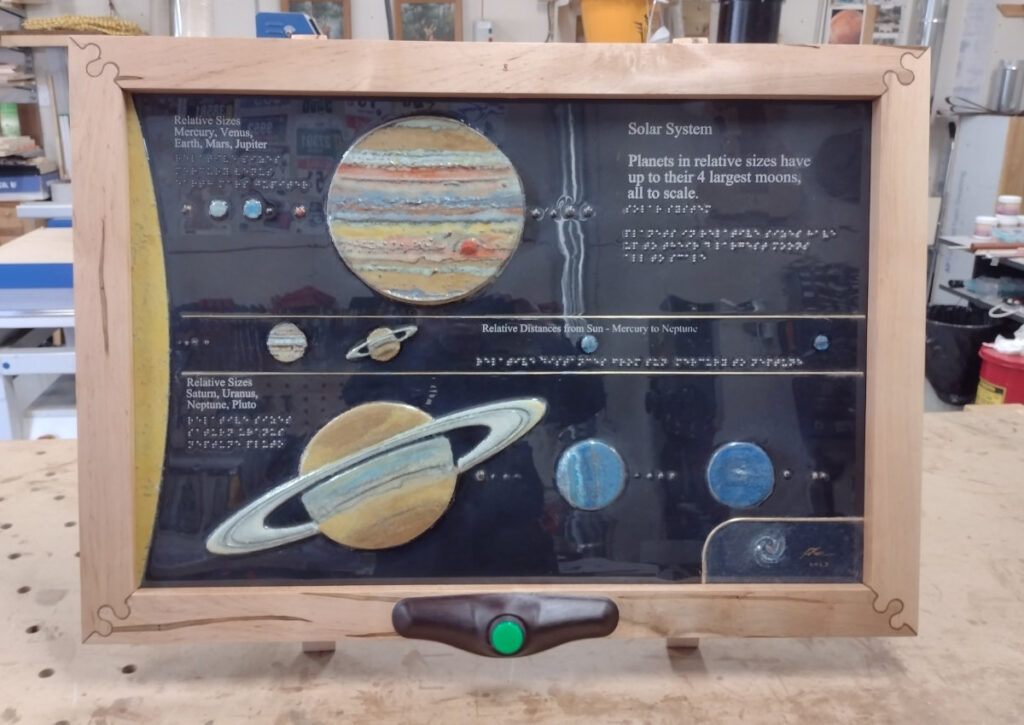
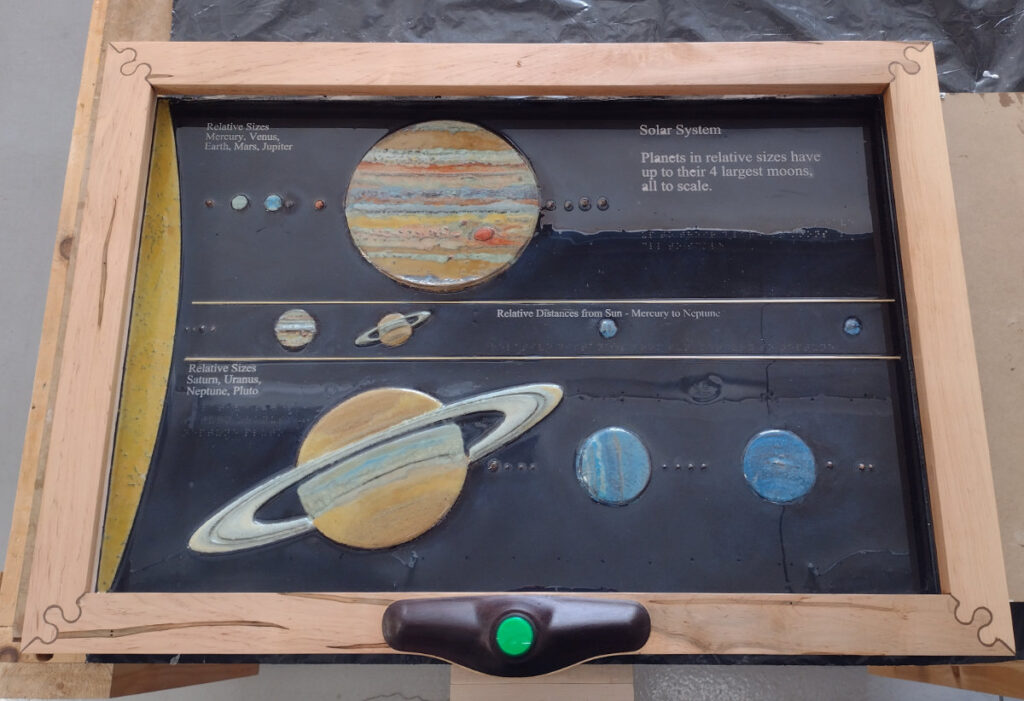
The Braille dots worked out great. I had the CNC drill 1.5 mm shallow pits, then manually glued in 2 mm stainless steel balls. A clear coat of epoxy went over all that, fully embedding the spheres. Unfortunately after the clear coat set I found a fine hair in the lower right. I sanded out the mark and applied another clear coat to that area, but it was obvious. So, how to turn a bug into a feature? Add an overview map of our Solar System’s location in the galaxy, of course! I did the CNC and epoxy work today. Once that’s set in a couple of days I’ll trim the edges and install in the frame.
I used the time that the epoxy was setting to make a display stand. I used the off-cuts from the frame itself. I also made a support wire for the back, so the piece can either be hung on a wall, or put on the stand.
2023-04-10
The mix on the epoxy clear coat was off, since it was the dregs. It took a week to cure, and even now is just slightly soft. I ran the drill toolpaths this afternoon for the Braille anyway, and they worked fine. I used a 1.5 mm cutter. The ball bearings I have are also 1.5 mm, so in principal should be perfect. I find them a bit small to the touch though, so I ordered some 2 mm balls. They will take up to a week to get here. Then I’ll try both and decide which ones to use. In the interim I’ll need to acquire some medium set epoxy. Applying all those small balls will be tedious.
2023-04-01
The assembled frame has 4 coats of Livos oil finish on the sides and front, and 2 coats of matte black paint on the back. The electronics module is installed and working. The speakers sound quite good, considering how small they are.
I filled the engraved text with white epoxy. Later in the afternoon I sanded down the white overflow and did a final flood coat of clear epoxy. Once that is cured and hard, I’ll engrave the divots for the Braille beads.
2023-03-28


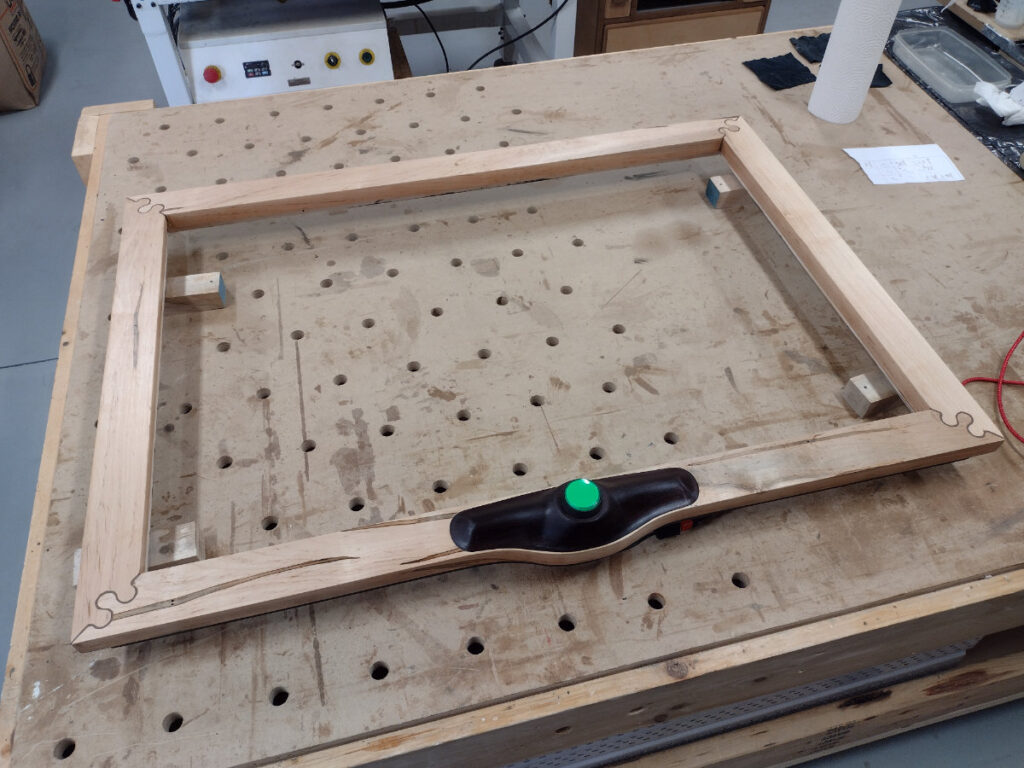
My goal for the day was to assemble the frame. A bonus was to engrave the text on the work-piece. I achieved both. The relieving of the frame joints didn’t take as long as I feared. I didn’t even have to force them. I aimed for a slightly loose fit, since I was planning on relieving the upper joints and infilling them. That worked quite well, highlighting the complex joints. The switch boss is Roasted Maple, which I know from experience turns near-black as soon as the finishing oil touches it.
Engraving the text worked fine also. The epoxy was hard enough to allow clean cuts. Only the interiors of a couple of lower case letters chipped out. The engraving looks good enough that I am thinking of just leaving it at that. I’ll decide by tomorrow whether to do that, or to infill the letters with white as originally planned. If I do that, I’ll do a final clearcoat to protect everything.
2023-03-27

Yesterday and today were long CNC machining days. Yesterday I did the sides and the boss, today I did the top and bottom. I also had an epiphany on the electronic module. I had spent a couple of days trying to get it to play. It turned out I had not named the file properly. The mandatory format is 0000x.mp3. I had left out a zero. Once I made it 5 digits, 00001.mp3, it played perfectly. The little speakers fit perfectly into the side pockets and sound surprisingly good through the drilled holes.
I didn’t provide enough relief in the joints, so I’m expecting that quite a bit of manual sanding will be required.
2023-03-21

The seventh and final colour layer of epoxy is on Solar System Project sculpture. It is a mixture of EcoPoxy “Caviar” black and deep blue sparkly “Midnight”. The edges are now quite well defined, with the assistance of a black Sharpie.
Once this layer is fully cured I’ll engrave the text, which I plan to back-fill with white or another contrasting colour.
2023-03-20
A couple of weeks ago I spent a lot of time getting to a basic level of proficiency with Matt Russo‘s Sonification code, then with Cakewalk by BandLab for turning the MIDI into audio. Here is the result. This will be embedded in a small player module within the frame. Activation will be by a large green button.
The Sonification is time-scaled left to right across the solar system. Piano represents the planets, Synth Strings the principal moons, and Baritone Sax (dropped an octave) background drone is a cross-section of the Sun. Timing is to true scale, pitch is mapped to object diameter.
2023-03-17

The image is not in sharp focus, but will give an idea of progress. The overflow epoxy was fairly easy to remove with a combination of miniature planes and a detail sander. I mixed quite a bit of “Caviar” and a bit of “Jellyfish” pigment into the epoxy. Tomorrow once the epoxy sets up a bit I’ll do detail touch-ups.
The change that doesn’t show is the plywood backing I glued on yesterday.
2023-03-13

The lighter colours have now had several passes of attention. I’m quite pleased with the colour blending, particularly on Saturn. I’ll leave this all to hard set, probably to Friday or Saturday. Then I’ll sand down the overflows around the planets. The last step for this phase of the project will be to apply 1 or 2 coats of black epoxy to the background. I had originally planned to make the background deep blue with orange highlights to simulate the ESA Planck image of the CMBR (Cosmic Microwave Background Radiation). I’ll leave that for a future project and just do a consistent black this time. Maybe there will be a few stars, we’ll see.
2023-03-10

Here’s how the sausage is made! Today I applied four spot colours to the higher profile areas. They of course bled downward, as I expected. Once these are set I’ll fill in the other colours for this layer – yellow for the sun, beige for the rest of Saturn, more whites and browns on Jupiter. I think I’ll go with near-black for the background.
2023-03-04
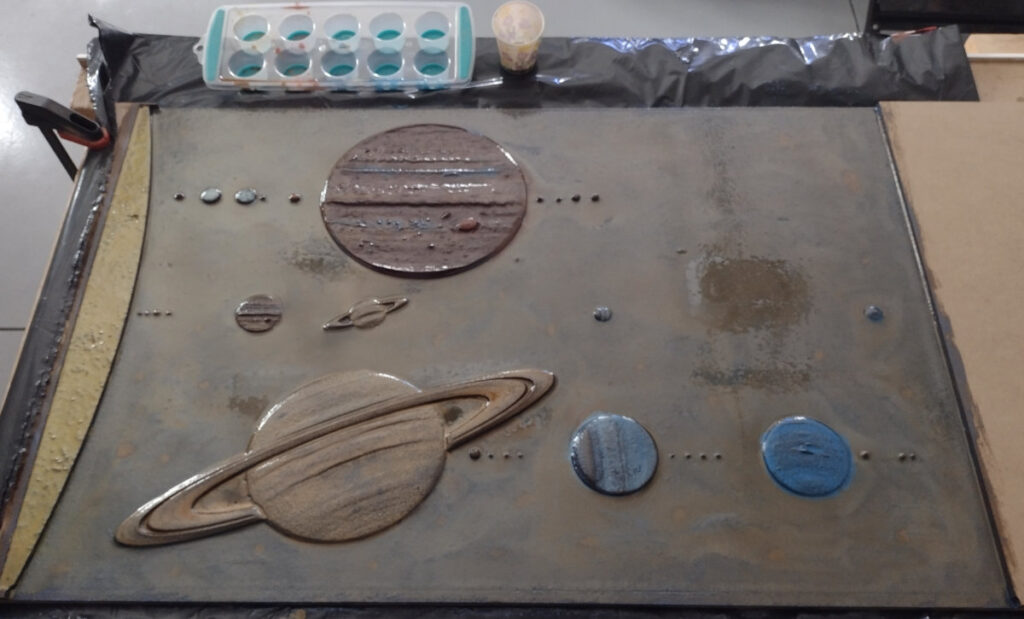
The third layer of epoxy took much longer, close to 3 hours. The colouring specific to each planet or moon is not very clear, but provides the base for more saturated colours with the next two or three layers. The epoxy is very low viscosity, so there’s a lot of bleeding. I’ll have to either make it a “feature” or try a more layered approach. I’m reconsidering the background colour.
2023-03-02

The second layer of epoxy made a big difference on the opacity of the finish. I made it a fairly deep blue, since that will be the base colour of the background. All subsequent layers will need to be coloured for each specific area.
2023-02-27

The first layer of epoxy has now had a day to absorb and start to cure. Once it’s tack-free I’ll sand down some of the planet and moon markers to round the tops and make the heights more consistent.
2023-02-26

A few hours of manual work got the SSP board ready for the more artistic portion of the project. I scraped smooth the machining marks on the flat areas, although there are still some minor irregularities. The planets and moons that were broken off during the machining have all been replaced with custom-turned dowels. The smallest, such as Dione, are only about 2 mm wide. Each raised area got a light sanding around the perimeter to eliminate rough transitions.
After the above picture was taken I applied a first seal coat of epoxy. Even though I added some blue tint, the result is still brown. It’ll take a few more coats before any colour is obvious.
2023-02-25
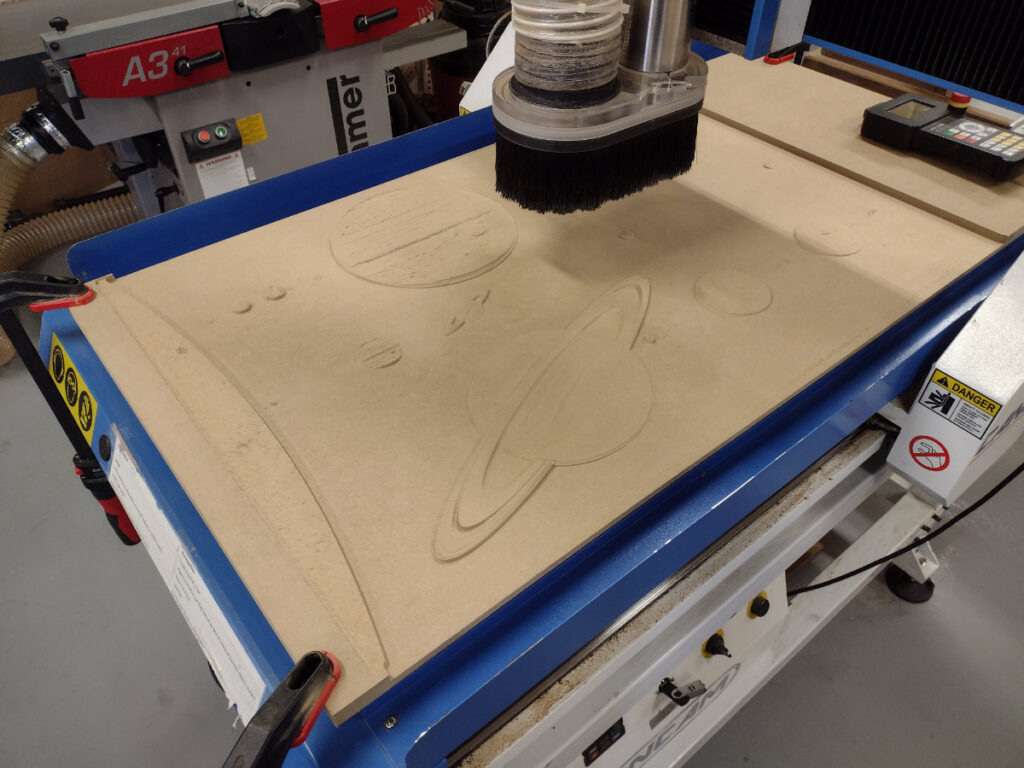
7 hours machining time! There were a couple of minor detours. Most of the way through the first finishing pass with the 1/4″ ballnose cutter, the CNC lost its’ location settings. This happens, although fortunately it’s rare. I had to reset the base locations and had it run the remaining parts of that toolpath. In this case, it was the “Distance” planets down the middle. In another case I loaded the wrong file, but it didn’t make a huge difference because it was the 1/4″ Ballnose file instead of the 1/4″ Tapered Ballnose file. I just reset the height down a bit over 1 mm and re-ran the proper toolpath.
This was the first time I tried using my ShopVac as a vacuum hold-down source. I don’t know if it made a difference on the accuracy results, but it sure was noisier for about 4 hours.
Tomorrow I’ll do manual cleanup and apply a base coat of epoxy.
2023-02-20

The spoil board on my CNC was getting tired, so I used it to test some ideas for my Solar System Project (henceforth occasionally “SSP”). The basics are sound, but I have a list of 9 items that can be improved. I’m also not happy with the NASA images I used for Saturn and Jupiter. Since the final colouring will be “artistic”, I will probably use the JWST image for Jupiter. For Saturn, I’ll see if I can find a better Cassini image.