This set of pages details the “Oh My Darling!” and “Cold Trap” projects, with a few small miscellanea.
Photo-Kinetic Sculptures

This is a record of the design and creation of the Lunar South Pole Photo-Kinetic Sculpture project.
I am accepting requests for bespoke Photo-Kinetic sculptures. Please fill out your information:
[everest_form id=”1052″]
- Cold Trap – PhotosThis sculpture is 570 mm diameter with the base 90 mm high. The central cylinder is 730 mm high. Overall mass is 14 kg. The surface is quite heavily textured. The highlight colours are muted against the black surface. Compared to “Oh My Darling”, “Cold Trap” is much darker and therefore probably a better representation of the Lunar South Pole.
- Cold TrapNo longer “Not Clementine”, this light sculpture is now officially “Cold Trap”. The original image is courtesy of the Lunar Reconnaissance Orbiter Camera. Originally intended to be the Proof Of Concept for this sculpture, it had more crater detail than the second copy I made from jointed Maple using an image from the BMDO “Clementine” mission. This image doesn’t show it, but the black finish has red metallic speckles in it throughout. There are also subtle colour variations in the rough highland areas. My intent is to imply different mineral deposits, possibly including water. And of course much of the … Continue reading “Cold Trap”
- LROCThere are now 5 coats of epoxy on this base (I think, I wasn’t keeping track). Because the last 3 coats had a black tint, the colours are very muted. The image doesn’t do any of it justice. The actual colours are more noticeable, and everything has a metallic sparkle to it. Once this is cured in three days or so I’ll hook up the electrical connections and call it done. I still need to name it. The original image is from the NASA LROC (Lunar Reconnaissance Orbiter Camera). It’s not Clementine, although both are centred on the Lunar South … Continue reading “LROC”
- Not ClementineThis one doesn’t have a name yet. It started as the proof of concept for “Oh My Darling”, made with MDF. The first layer of epoxy soaked in, using almost a half litre. This morning I did the second coat with some EcoPoxy Ebony tint. It’s not very opaque, so I’ll have to figure out how to cover the lighter repaired areas. This version will be lights-only, not water fountain component.
- Oh My Darling – photosSometimes still images are clearer than video. The colours are random.
- Oh My Darling VideoI put together a decent quality video of the “Oh My Darling Clementine” sculpture in action. Thanks to NASA/BMDO for the original composite image, and to Tom Lehrer for the accompanying music. Both are in the public domain.
- Oh My Darling!Well that didn’t exactly work as planned. The “Oh My Darling” sculpture works great as a light display. As a fountain that isn’t supposed to leak all over the surrounding environment, no. Those two coats of low viscosity epoxy that were supposed to seal everything? Didn’t. Not only are there leaks around the bases of the acrylic tubes, which wouldn’t have been a surprise, there are also leaks in the wall joints. I have no idea how those could have been a) loose enough and b) not sealed by the epoxy, to actually let quite a bit of water through. … Continue reading “Oh My Darling!”
- Urn for 100 kgThis one is made from a spare short Maple board. I’m also using a small piece of Roasted Maple and one of Olive. I have no client for this, it will be an example of my work and available. It’s sized for the remains of a person of up to 100 kg mass (220 lb weight). As always, the grain is matched around the perimeter.
- Fountain Sculpture LitThe plumbing will have to wait for my latest Amazon order to arrive. Meanwhile the epoxy is cured and the electronics parts work. The controller is app-based and has 200 pre-programmed patterns as well as full manual control. The second epoxy clear flood filled in the lower areas and hopefully sealed the acrylic tubes to the base. It also produced a glossy finish. I am pleased.
- 2 Urn BoxesFour coats of tinted Livos Natural Oil brought out the character of the maple and walnut beautifully. The matched release magnets work perfectly. To open the boxes, they are placed face to face according to the ebony insert alignment marks. The lip on the top aids in using a fingernail to lift the lids. The two boxes will hold ashes for a person of up to 90 kg (200 lb) so should be plenty large enough for most. To close the boxes, the lids are inserted and the boxes separated. A gentle push downwards locks the mechanisms. I am very … Continue reading “2 Urn Boxes”
- Epoxy FloodRather than buying just a litre of epoxy, Nine45 sold me an entire ChemTec kit of 11.34 litres. That’s probably more epoxy than I’ve used in my life so far. I mixed about a half litre for painting the top side of the fountain base. I used less than a quarter of it painting the entire top and sides. Then I added small bits of the sample EcoPoxy colour powders that I have. To mix them into the epoxy I used a small painter’s brush to blend them in. I had prepared a tray for the excess. It’s about a … Continue reading “Epoxy Flood”
- Urn BoxesThis is a follow-up project to the two Booze Boxes. This is a matched pair, with wood grain running consistently between them. They will hold half the client’s ashes each. I am still working on the lid release mechanism. I’m not sure if my idea will work in practice. I’ll find out tomorrow. If not, I’ll revert to the exposed magnets.
- Some Epoxy AppliedThe last of my EcoPoxy was just enough to coat the underside of the base and access panel on both sides. The mix ratio was off on the last batch for the panel, so it will need to cure for a few days longer than usual. It can sit aside while I work on the other parts. A few days ago I drilled holes in the base for the power feed and switches. If a solenoid activated valve is available I’ll add a power drain feature, which will involve two more holes on the perimeter. Once this layer is cured … Continue reading “Some Epoxy Applied”
- Tensegrity TestWay back in the dark ages of University I built several Tensegity structures. They were inspired by my reading of the thoughts of R. Buckminster Fuller, a true visionary. Those structures are long gone. This afternoon, lacking any urgent projects, I laid out the components for a test based on a Lego tensegrity structure I saw recently online. It works. I didn’t get the tensioning screws working, but it is stable enough to prove the concept. I may use this approach in future projects.
- Fountain base machinedYesterday was a long, noisy, busy day. I had expected that the machining for the top would take 3 days. I started at 10 am, took a brief dinner break, and finished at about 10:30 pm. The time projections were based on 2D work, the 3D times turned out to be a bit less. There were several areas that had not filled with the epoxy pours. I used epoxy putty to fill the worst ones, but some remained below cut level. I’ve ordered more from Lee Valley, and will manually fill and blend in the missing areas. Once the entire … Continue reading “Fountain base machined”
- A Small CommissionA person who liked some of my other work commissioned me to make two commemorative boxes. The are the same general pattern as some others I have made. Each is slightly different, not only in size. These two us the same approach of having two Walnut strips, whereas previous ones only had one. I also made the feet simpler by just using the half inch magnets without the wood dowel to hold them. It looks cleaner and avoids the potential problem of the release magnets being in the wrong direction. I also added two locator marks on the top and … Continue reading “A Small Commission”
- Side ProjectI recently had a request form someone who had seen my work at the Valley Artisans Co-op. She wanted a book stand. By co-incidence, Jayne had expressed interest in one as well. The one on the right is Jayne’s, the other for the inquirer, if she likes it. This project took far longer than it should have, partly because I used wood from the leftovers bin. The verticals are inset in the cross-shelf by about 2 mm. I used epoxy because of the small bearing area. In the left one I also added reinforcement corners underneath. Both stands are more … Continue reading “Side Project”
- Top flattenedWhenever I’ve done a flattening run on anything, whether a spoilboard or work piece, there have been low ridges. I finally made a CBE tramming device out of dowel and length of stiff wire. It bounces, but is good enough for my purposes. I got the Y axis set very close, but the X axis isn’t really adjustable. Even so, today’s flattening passes on the fountain base have ridges that are barely noticeable to the finger. They show up visually, but that’s due to the wood fibres. Given that this is end grain, I’m satisfied. The base is now 105 … Continue reading “Top flattened”
- Underside machinedThat was certainly messy! I started with the Shop Vac attached to the dust boot. However, since I was using my longest straight bit, the boot was all but useless. Then I attached the dust system hose and used the Shop Vac to keep the work area from getting too filled with chips. The total cut time was over 3 hours. I had to stop the machine path for the copper pipes. For some reason I had specified them as 12.5 mm. After updating the tool path for 16.5 mm I re-ran it as the last tool path on the … Continue reading “Underside machined”
- Base is backMitch and Liana dropped off the potted base this morning. Now the long, detailed CNC work can begin. But first I sanded the perimeter clean and glued on sacrificial hold-down blocks. Once the glue is fully set I’ll drill hold-down holes. The bottom is fairly level but I will still run a flattening pass. The top is less flat, so I shimmed the gaps all around. The order of operations will be flatten and machine the bottom cavities first. This shouldn’t take more than a few hours of machine time and is not dimension sensitive for the most part.
- LED Sections WorkWell that had its’ frustrating moments. Some of the wire contact pads tore out, so I had to solder in bypass wires. Then half way through I realized that I didn’t need a return line for power and ground from the tops, I could just home run all the power connections. So the wiring is a combination of daisy chain and home run. Only the data line is consistently daisy chained, as it must be to work, and to produce a fully sequential pattern. Next I have to epoxy everything together and ensure that the top transition from copper to … Continue reading “LED Sections Work”
- First LED section worksSoldering the wires onto the tiny contact patches on the ribbons turned out to be far less frustrating than other times I’ve done it. The key is to scrape all the silicone off the contact area with a machinist’s file until the copper is glossy, tin the pad, then apply the pre-tinned wire. It was trickier getting the shortest ribbon wrapped evenly around the shortest tube section. I also managed to reverse the ribbon sequence, from end to beginning, but as long as I’m consistent it’ll work. There’s a blank area at the top of this one because of the … Continue reading “First LED section works”
- Tops EpoxiedI think I have the sequence of operations figured out. Today I epoxied the top caps in place and coated them with epoxy. For this I used System 5 epoxy, since a 5 minute setting time was fine. It just meant wasting quite a bit, with a separate batch for each cap. I didn’t have disposable brushes so I used the folded corner of a bit of paper towel. Half way though I though to heat the part after spreading the epoxy, thus lowering the viscosity and making for a smoother surface. You can see the epoxy coating on the … Continue reading “Tops Epoxied”
- Tubes in TubesUsing a crappy old pipe cutter is a good way of wasting expensive copper pipe. I found one in a box of plumbing supplies from my father. As long as I maintained significant sideways pressure during the first couple of rotations, it tracks true. Otherwise it travels a spiral. With only about 20cm of waste, I got the pipes I need. I’m guessing a bit on the exposed extension that will work, based on space available but with no idea about how I’ll run the pipes back to the manifold. In any case, the pipes within pipes are ready for … Continue reading “Tubes in Tubes”
- New SpidersI’m sure I’ll eventually find a use for the larger spiders. They might make nice wheels on a toy. The new ones fit the inside diameter perfectly. I had to sand the central holes a bit because apparently copper pipe isn’t exactly round. The epoxy filled base delivery has been delayed a bit, so in the interim I’ll keep working on the pipes. I have the LED ribbon so tomorrow’s project will be to cut that into the 7 sections and start wrapping it around the pipes.
- Light Tubes & CapsThe base is with https://nine45.ca for filling with Epoxy. I should have it back in a few days. In the interim, I’ve been working on other projects from my list. The first was to build a set of “Kitchissippi” chairs. I had purchased the Eastern White Cedar late last year, and it’s been stickered and acclimating since then. I’m building 4 chairs for the shop, so it took a while to make all the parts. They are all ready for staining once I can do it outside. The past couple of days I’ve been working ahead on the light and … Continue reading “Light Tubes & Caps”
- Base ready for fillingTrimming the middle plug on the bandsaw didn’t take long once I had marked the limits. Once the glue was set on the middle, cutting off the extra joint sections didn’t take long either. Sanding the extra bits took about the same time, under 10 minutes. Now it’s ready for Nine45 to take it away and flood it with epoxy.
- Birthday!Today is the anniversary of my 49th birthday. I spent it happily in the workshop. The Wainlux laser engraver I had supported on Kickstarter last summer arrived this morning. It’s been delayed for various reasons, not least because the developers overshot their Kickstarter goal by over 100x. After loading the driver and software I ran 3 tests. They all worked fine without issues. The goal for the day had been to glue up the centre plug for the fountain base. That’s done too.
- Base Partly AssembledToday was productive – I got more done than anticipated. After lightly sanding the flash off the wall segments I did a trial assembly. The fit is quite loose, so assembly was no problem at all. Then I applied a strap clamp to judge the size and fit. It was fine. Diameter is now 565 mm, almost exactly what I had planned. Then I applied glue to the interfacing joints and clamped the assembly for several hours. While the glue was setting I realised that the first pass pieces could be trimmed to use as infill. I set my mitre … Continue reading “Base Partly Assembled”
- Second Wall Set DoneAnother 3 or so hours of machine time and a bit of trial and error at the start, and the tenons of the wall segments are done. The first try, on the previous test piece, showed I again had the Y axis set incorrectly. I also increased the cut depth a bit. From there on, everything went smoothly.
- Second Wall Set StartedAfter some fiddling and adjusting, I created 11 good wall sections. The first one turned into a test piece, since I got the Y and Z axis alignments wrong. So I had to cut another section from the board, the lower one in the second photo. Then it was just a matter of standing with the dust system hose in place to reduce the chip mess. Each section took about 15 minutes. Tomorrow I’ll do the tenon side. I expect there’s be a bit of adjustment on the first one of those as well.
- Bits are in!Yesterday the 2 long half-inch cutter bits arrived. Today I worked on the machining fixture. I had already added a reinforcing platform to the front. Today I machined it to height to accommodate the 16.3636 degree slope required. Then I carefully aligned the fixture on the CNC spoil board so that the X axis is as exactly inline as possible. The compression clamp on the right will ensure that the left of the workpiece is properly registered. I run 2 screws in from the left to be sure.
- Well that didn’t exactly workSomething was off. I did manage to get the ring sections joined with the help of a strap clam and a big rubber mallet. But they didn’t want to close up, so I left everything clamped to the table and called it a day. It was New Year’s Eve so to time to go “celebrate”. I opened what I believe to be a 20 year old bottle of Mumm’s Champagne. It wasn’t very good and the remaining half will be dumped. Today I looked carefully at the parts and the jig. Some sections had broken off the parts. As far … Continue reading “Well that didn’t exactly work”
- Wall piecesEach section takes about a half hour on the CNC. Today I had a shorter day, being Wednesday with noon commitments. I stopped at 15:30 when 6 were done. I’ll do the other 5 tomorrow and do a a test assembly. So far nothing broke and there were no injuries.
- Successful JointsEvery pass gave additional feedback for further adjustments. First it was clearance, then positioning, then depth of cut. The -0.375 mm clearance works well. The tenons still protrude because the flattening cut is of course at half the included angle. I decided just to skip the flattening pass and trim the extra with the band saw or plane before sanding. The other consequence of the adjustments is that the usable section length is shorter than my original plan. That just means that the fountain diameter will be less than planned by about 100 mm.
- Clearance tests4 test cuts later, and I have a joint that works. I started with a -0.125 mm clearance on the mortice, moved to -0.250, then tried -0.5 mm. The last works, but is now a bit loose. I’ll try again tomorrow with -0.375. I also completely redesigned the joint. The other one was adapted from my Raven Desk joints, which were cut with a 1/4″ cutter. This time I have to use a half inch cutter because of the depth of cut. This latest joint is based on circles with a 15 mm diameter, assuring lots of clearance for the … Continue reading “Clearance tests”
- First Test CutFirst test of the fixture is a partial success. Nothing broke. No-one was injured. The joints don’t mate. I left the -0.125 mm allowance that has worked well in the past. I’m thinking I didn’t rotate or reflect the joint design correctly. Since this is my first asymmetrical joint, that’s probably the reason. The other good news is that the angle is exactly correct, within measurement error. Man, it sure was nerve-wracking though. I don’t like long bits or deep cuts. I reduced the feed rate to 40 IPM with a 6 mm pass depth, so it was fine. But … Continue reading “First Test Cut”
- Pieces readyThe machining fixture is ready and fits the side pieces perfectly. The pieces for the side are clean and cut to size, ready for machining.
- Creating the WallAfter thinking about this for several days and partial nights, I realized that adding fancy joints to the perimeter wall would add a lot of interest. The problem is that the joints will have to be at an odd angle, that angle dependent on the number of sides. I decided not at all arbitrarily to make 11 sides. I’ll leave the reason “as an exercise for the student”. In any case, I laid out a design for a machining fixture in VCarve and made it out of 18mm Baltic Birch. Now I just need clamps to hold down the work … Continue reading “Creating the Wall”
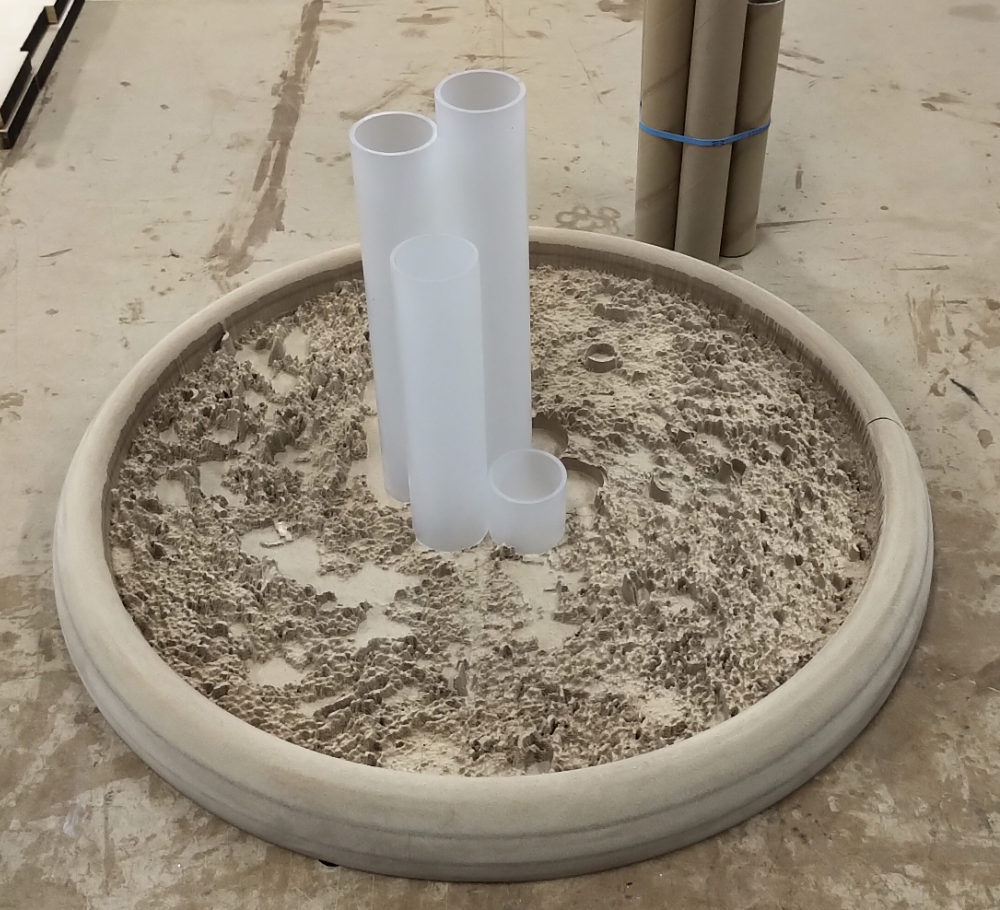
- Raw MaterialsI started with a composite image courtesy of the NASA Lunar Reconnaissance Orbiter, used a Fusion 360 plug-in to turn it into an STL file, then imported the STL into Vectric VCarve Pro. From there I was able to generate the tool paths for the CNC. The test piece is made of MDF. The white cylinders are a place-holder for the 7 that will eventually form a fountain. With the recent confirmation of water on the Moon, I think this is a timely project. I’ve since found a better composite image from the NASA Deep Space Program Science Experiment (Clementine). … Continue reading “Raw Materials”
- LSP Proof of ConceptThis LSP Fountain is a project which I have been contemplating for a long time. It brings together my fascination with all things celestial, my interest in wood, life-long experimentation with lighting and electronics, and gradual improvements in my CNC skills.
- Previous updates2020-10-26: The “Nahrung” project is in the early design stage. In the interests of extending my custom woodworking skills, I’ve undertaken another project for now, a more complex one but where I have a clearer idea of the design. The working title is “LSP”. This is my first fully 3D project. I started with a composite image courtesy of the NASA Lunar Reconnaissance Orbiter, used a Fusion 360 plug-in to turn it into an STL file, then imported the STL into Vectric VCarve Pro. From there I was able to generate the tool paths for the CNC. The images above … Continue reading “Previous updates”